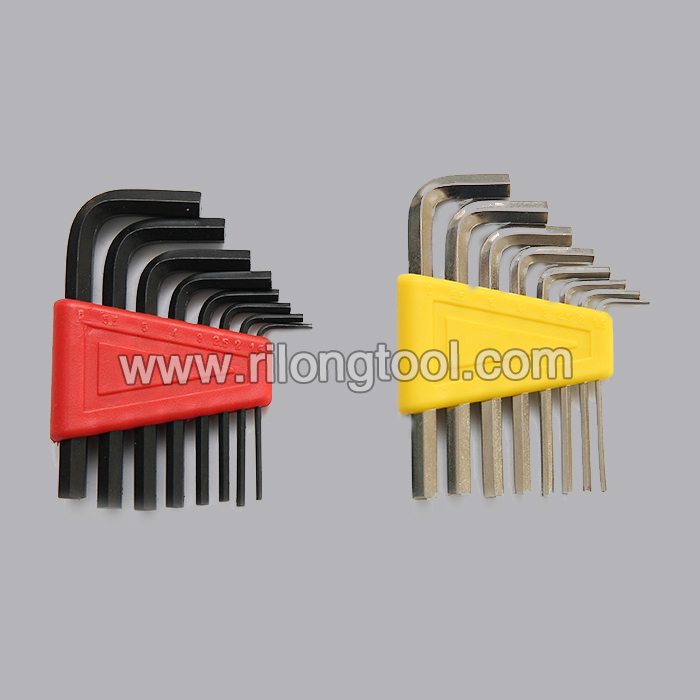
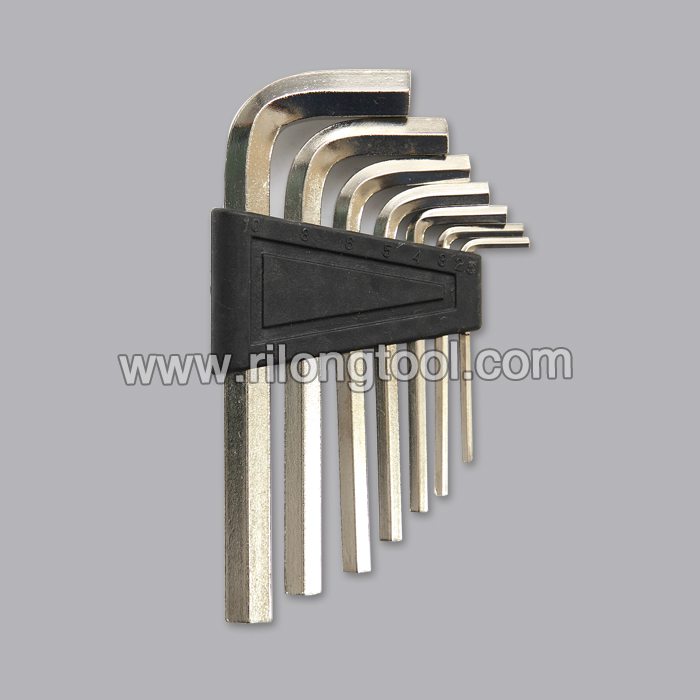
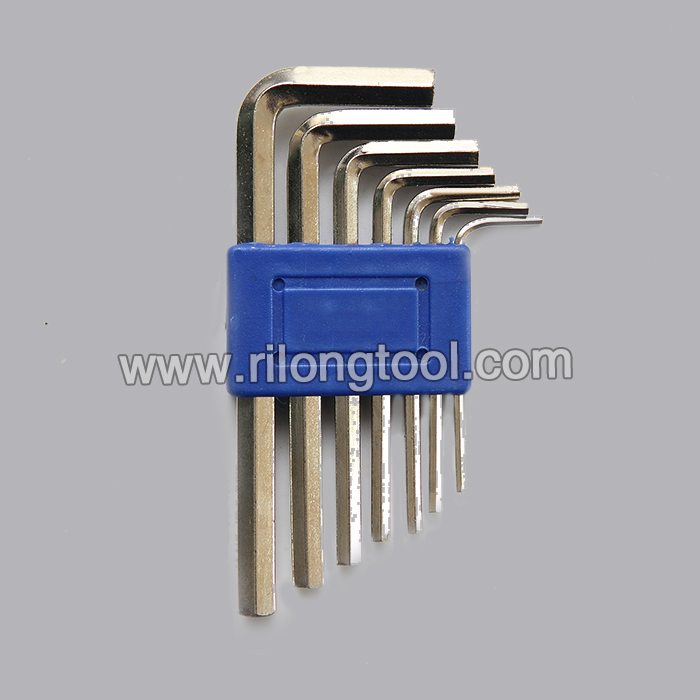
OEM Supplier for 7-PCS Hex Key Sets packaged by plastic frame Turkmenistan Importers
Short Description:
Product Detail
Product Tags
Our personnel are always in the spirit of "continuous improvement and excellence", and with the superior quality products, favorable price and good after-sales services, we try to win every customer's trust for OEM Supplier for 7-PCS Hex Key Sets packaged by plastic frame Turkmenistan Importers, We are confident that there will be a promising future and we hope we can have long term cooperation with customers from all over the world.
Basic Information
■Model Number: RL-NLJ007
Additional Information
■Material: 45# Carbon Steel
■Size: 1/16″-3/8″, 1.5mm-10mm
■Surface Treatment: Zinc-plated, Black Oxide
■Heat Treatment: Optional
■Package: Plastic Frame
■OEM: Acceptable
■HS Code: 8204110000
■Samples: For FREE
■Delivery Time: Always 30 working days depending on the order quantity
■Packing: By standard cartons
Product Description
■Ningbo Rilong Hardware Tools Factory can provide various kinds of Hex Key with different sizes and packages.
Product Image
Today we’re twisting wire and making our own earring frames. So here are the materials you’ll need today. I’ve already made one earring, so if you’ll just double these supplies to make two for yourself.
You’ll need a 10″ piece each of 20 and 24 gauge dead soft sterling silver filled wire. You’ll also need some little 3 mm pearls, 10 or so for each earring. A 6 mm sterling silver plated jump ring, a 6 mm x 10 mm teardrop bead top-drilled, although you could use one up to 15 mm long, and an ear wire. For tools you’ll need chain nose pliers, round nose pliers, wire cutters and a pair of vise grips, plus two 1″ pieces of Popsicle stick and you’ll need an oval mandrel.
Now, we’re going to twist our 20 gauge wire. The first thing you want to do is put your ends together, and then just fold it in half leaving a soft loop at the middle. Place those two wire ends over one of your 1″ pieces of Popsicle stick, and then place the other piece of wooden Popsicle stick over that, so that the wires are sandwiched in between. That will ensure that the end inch doesn’t get twisted, and also protect your wires from being marred. Then go ahead and place these pieces in the jars of the vise grips, make sure they’re nice and tight. Now, place your round nose pliers in that loop and just twist your vise grips. I twisted about 30 times. Now, you have your twisted wire.
Next bend up that loop right there. This will help you hold it. We’re going to place that on our oval mandrel. Just hold that loop right up one point or short end of the oval, and then wrap your wire around, separate out one of those 1″ ends and hook it around that loop. Then you can slide that off your mandrel, and use chain nose pliers to finish wrapping that end around this loop. Then center that big loop over your frame. Now, I don’t really want an oval shape here, I want a teardrop shape, so I’m going to just use my fingers to straighten those sides.
Now, the final step on this frame is I’m going to grasp that remaining wire with chain nose pliers and give it a 90 degree bend. Grasp that end with my round nose pliers, and make a loop. Then you can bend that down inside the wire frame. You could take a little time and just shape it so everything is hanging nicely and straight.
Next, take your jump ring, open it up, slide on your teardrop and also slide that through the loop hanging down on your earring frame. Close it up, and then what I like to do whenever I’m putting a teardrop on a jump ring is I’ll work the jump ring around so that the split is inside the bead. There it is all attached.
Now, you could stop here, or you could go on to the next step which requires the 10″ piece of 24 gauge wire, and you’re just going to wrap this not quite at the center bottom of your frame, and just give it two or three wraps to secure it. Then we’re going to start sliding on our little beads. You just want to decide which side is the front of your frame, and then use your thumb to hold your bead at the front, while you wrap the wire around and through the frame. Add another bead, and repeat holding it towards the front. Wrap the wire around. Continue until you’ve done four beads or gone back about to the same spot on the other side of the frame. Once you’ve gotten to the other side, go ahead and do an extra wrap, just to secure everything.
Now, slide on another bead and work back in the opposite direction. You can just wrap the wire between the beads you’ve already added. Sorry this keeps flinging out of the frame. The wire is kind of springy. You can keep going with this using as many or as few beads as you like. I’m going to do a few more just to have a nice cluster.
Then once you’ve added all the beads you want, you can take your wire and just make some wraps over and around the pearls. It just adds a lot of interest. I’m going to patina this piece with liver of sulfur, so the silver wire will be dark in the crevices and then I’ll polish it up at the high points. That’ll be a nice contrast against the pearls. When you come to the end of your wire, you may need to trim it off or tuck it in, if it’s on a convenient spot for tucking.
The final thing to do is open your ear wire. Make sure your earring is facing the right way. Pop it on, and you’re done. A very interesting pair of earrings with frames that you made yourself.
Here’s another look at the earrings we made today. It’s a lot of fun making your own components for your jewelry so they can be exactly the sizes and shapes and materials you want.
Check out the latest install video from Heatshield Products. How to Install Stainless Steel Locking Ties without Special Tools
https://www.heatshieldproducts.com/automotive/heat-shield-tape-and-fasteners/thermal-tie
Stainless steel locking ties are a great way to secure any type of high temperature insulation. There are a lot of methods and goofy tools people will try to sell you. We figured it was about time we showed everyone an easy way to install without spending extra money. You can install our Thermal-Ties (or most manufacturer’s stainless ties) using common tools already in your tool box. All you need is a pair of diagonal pliers, needle nose pliers or bent needle nose pliers.
It’s easier to start by loosely wrapping the locking tie around the pipe. Slide over your insulation, then hand tighten. Trim most of the tie off, leaving you three quarters of an inch of a tab. Use the needle nose pliers to twist the tab down and back into the tie. Repeat that process one more time, and you are done!
See how easy that was, and you didn’t have to spend money on something that will just clutter up your toolbox.
Thank you for watching,
Heatshield Products, Inc.
YouTube Channel:
https://www.youtube.com/user/HeatshieldProductsTV
Product Video:
https://youtu.be/0WumKMxqz8M
LET’S CONNECT!
Heatshield Products
– https://www.facebook.com/HeatshieldProducts
– https://www.google.com/+heatshieldproducts
– https://instagram.com/heatshieldproducts
– https://twitter.com/heatshieldprods