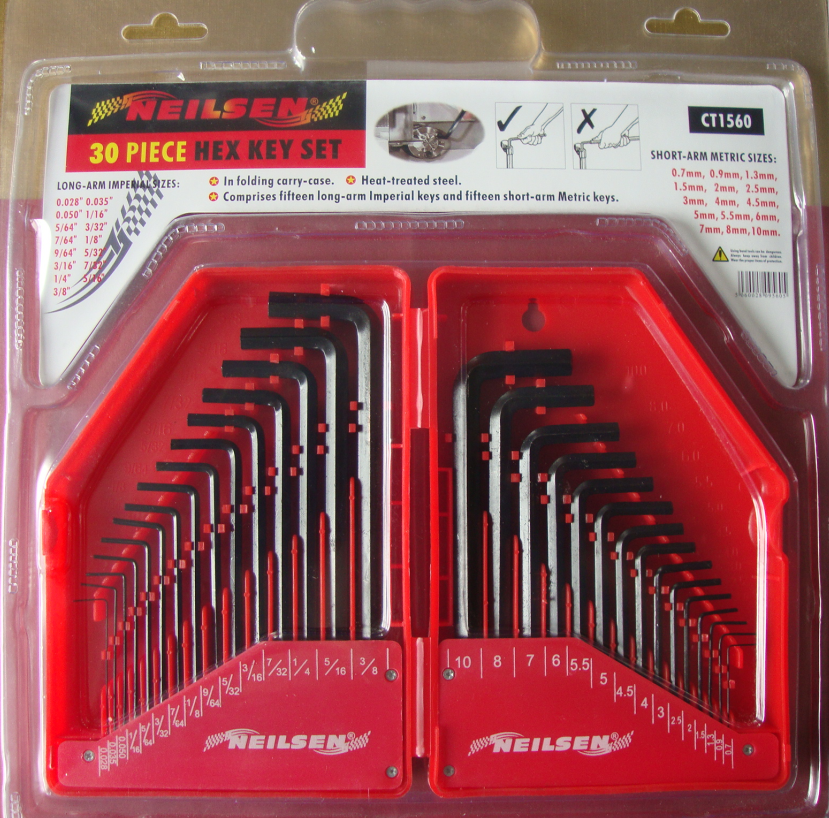
Manufacturing Companies for 30-PCS Hex Key Sets packaged by BMC surface by Black Oxide to Bulgaria Importers
Short Description:
Product Detail
Product Tags
We are committed to providing easy,time-saving and money-saving one-stop purchasing service of consumer for Manufacturing Companies for 30-PCS Hex Key Sets packaged by BMC surface by Black Oxide to Bulgaria Importers, we are looking forward to even greater cooperation with overseas customers based on mutual benefits. Please feel free to contact us for more detail
Basic Information
■Model Number: RL-NLJ015A
Additional Information
■Material: 45# Carbon Steel
■Size: 0.028″-3/8″, 0.7mm-10mm
■Surface Treatment: Black Oxide
■Heat Treatment: Optional
■Package: BMC + Double Blister Card
■OEM: Acceptable
■HS Code: 8204110000
■Samples: For FREE
■Delivery Time: Always 30 working days depending on the order quantity
■Packing: By standard cartons
Product Description
■Ningbo Rilong Hardware Tools Factory can provide various kinds of Hex Key with different sizes and packages.
Product Image
Deerbusters.com installation video for attaching hog rings to your deer fence using the hog ringer tool
first how to guide for my channel too and it actually was able to film it live so that it went off without a hitch *yay*
Things you’ll need:
-Clear Acrylic Pipe
https://www.usplastic.com/catalog/item.aspx?itemid=37958&catid=440
Style I used: 44660, 1″ Diameter, 36″ pieces (the tubing is sold in 6′ pieces, made two by cutting the rod in half with a hack saw.)
-Conventional Oven
with a large heating area that can fit about a foot and a half of the cane inside of the heated space.
-Vice Grip
standard vice that you can clamp the piping down.
-Protected work gloves.
Leather works best, or gloves that are able to seal out hot temperatures.
How To Steps:
ADULT SUPERVISION OR COMMON SENSE REQUIRED. Objects you will be dealing with will be hot, and you will be using a heated space. Please do not do what I do and turn your back on the piping while its inside the oven. bad things can happen at 400 degrees
1) Preheat oven to about 400 degrees Fahrenheit (204.4 degrees Celsius)
The piping melts at 360 degrees, so you want the space to be heated a little bit over that to where the piping will easily be able to bend to.
2) Once prepared, open the door to the oven ajar, and prop your rod inside, leaving half of the pipe outside the oven door. Best way to do this is to hold it inside at an angle, so that the piping is not touching the grid, or the oven’s side. Metallic objects inside of the oven will heat up faster than the air inside the device, and can melt the tubing in ways you do not want it to melt. If you lay it down on the grid facing, the tubing will start to melt around the grid, etc – you will not have a solid round form to the piping any more
3) Cook time: 7 to 10 minutes. Allow the tubing to cook evenly in the heated space. The trick here is to allow the tubing to heat evenly. Be sure to keep the oven door cracked – not wide open – so that the heated air is able to stay within the oven. (if the door’s wide open, this will take longer to heat evenly, and you’ll waste a ton of energy.)
You do not want the pipe to get to the point where it will start to melt entirely, just heat it to a point where the plastic will be soft enough to bend at a 90 degree angle. Best way to tell if it is ready is you will be able to start to smell something similar to wet paint.
**The thicker the pipe, the MORE wait time you will have to leave it in the oven for to get it to a bendable temperature. The Thinner the pipe, or if it is Hollowed out the LESS time it will take. 7 minutes is roughly the time it took for an 1″ thick diameter. Might be a little bit of a guessing game, but you can test this out, by putting it in the vice, try bending it slowly, then stick it back in the oven if it needs more time.
**WEAR PROTECTIVE GLOVES FOR STEPS 4 and 5
4) DO NOT TOUCH THE HOT BITS AND BURN YOURSELF!
Keep in mind which side of the Acrylic tubing that you put inside the oven. If it heated evenly, the rod will still remain clear and discolored, so be sure to keep it away from you. The longer that you leave it in the oven, the hotter the piping will be – mine when I took it out I guessed at about 100 degrees.
5) Bending via Vice Grip
Place the Piping securely within a flat plated vice (one that has no teeth to leave dents on the piping). Estimate where exactly you want the pipe to start bending to and secure it tightly by winding the plates together. SLOWLY, push/pull the piping in the direction that you want to apply the angle to. Your own body weight should be more than enough pressure to bend the piping at the heated temperature. If the piping shows a lot of resistance, you may have to reheat it and allow a bit more time for the tubing to heat to the right temperature. When the pipe is at the right angle that you want it to bend to, be sure to hold it in place for a minute or two as the piping continues to cool down before releasing it from the vice grip
6) Optional: Run the piping under Cool/Luke Warm Water
Easy way to get it to cool down quickly is to run the piping under cool water for a couple of minutes. NOT COLD – but cool. I know when you super heat metal and glass, then stick it directly into freezing cold water it opts the material to becoming more brittle and the material can break do the the contrasting temperatures in a short amount of time. I’m not sure if this is the same case for Acrylic, but why push your luck?
7) Let stand upright and let cool off.
Wait about 30 minutes to an hour before you start to play with it more. The plastic will continue to cool down at its own rate. When its back to it’s normal room temperature, the plastic will not bend out of shaping, and you’ll have a new solid curved angle on your tubing/prop/cane.