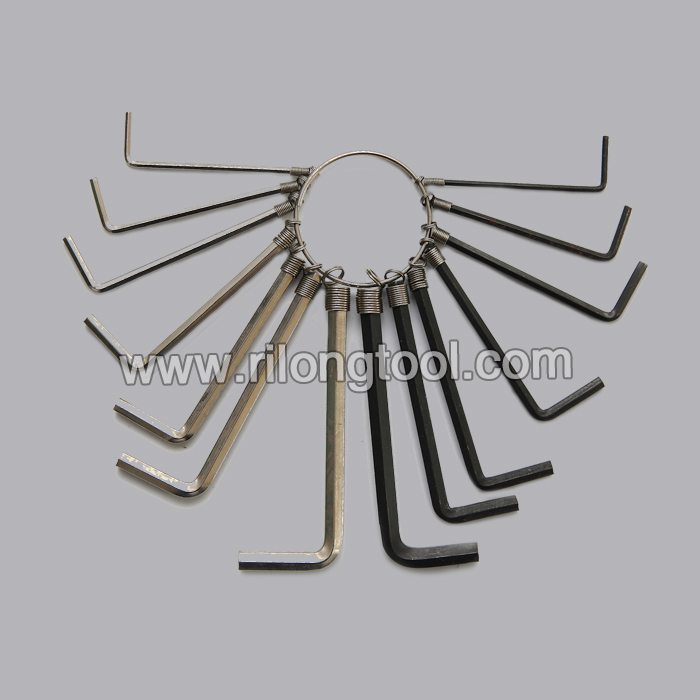
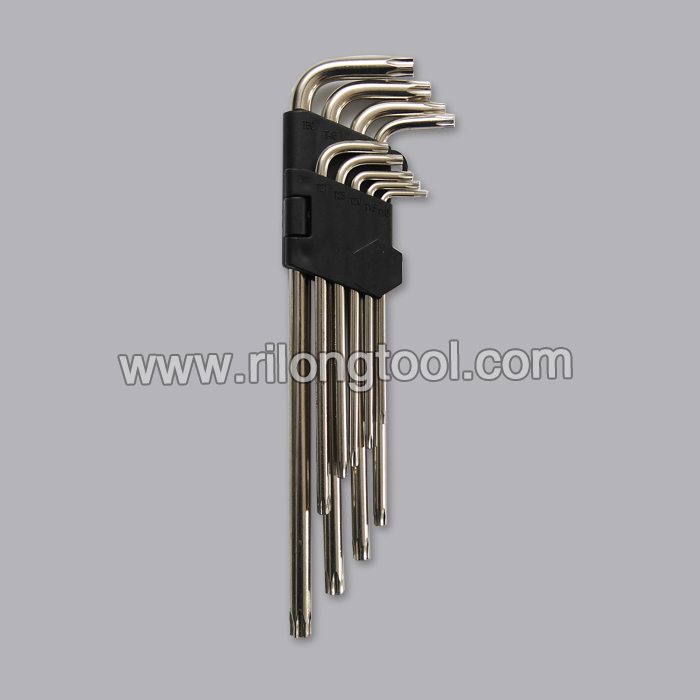
High Definition For 9-PCS Double Star-type Hex Key Sets packaged by folded plastic frame Wholesale to Korea
Short Description:
Product Detail
Product Tags
We have a professional, efficiency team to provide quality service for our customer. We always follow the tenet of customer-oriented, details-focused for High Definition For 9-PCS Double Star-type Hex Key Sets packaged by folded plastic frame Wholesale to Korea, Our aim is to help customers realize their goals. We are making great efforts to achieve this win-win situation and sincerely welcome you to join us
Basic Information
■Model Number: RL-NLJ013
Additional Information
■Material: 45# Carbon Steel
■Size: 1/16″-3/8″, 1.5mm-10mm
■Surface Treatment: Zinc-plated, Black Oxide
■Heat Treatment: Optional
■Package: Plastic Frame
■OEM: Acceptable
■HS Code: 8204110000
■Samples: For FREE
■Delivery Time: Always 30 working days depending on the order quantity
■Packing: By standard cartons
Product Description
■Ningbo Rilong Hardware Tools Factory can provide various kinds of Hex Key with different sizes and packages.
Product Image
Wire bending (closing loops)
https://chevroletforum.com/how-tos is the leading Chevy Silverado resource for technical guides. Knock sensors play an important role in your Silverado’s engine functionality, detecting any engine noises caused by early detonation and adjusting the ignition-timing accordingly. For the full step-by-step article, please visit https://chevroletforum.com/how-tos/a/chevrolet-silverado-1999-2006-how-to-replace-knock-sensors-391168
Symptoms of a bad knock sensor include a check engine light, loud thumping noises coming from the engine, or shaking, vibrating, and misfires on a cold start.
Replacing the engine knock sensor will take an hour and is only moderately difficult. The cost for the supplies comes to just $100.
The supplies you’ll need are a new knock sensor, a flathead screwdriver, 8, 10, and 12 millimeter sockets, ratchet, various length extension, 3/8th fuel line disconnect tool, needle nose pliers, vacuum, penetrating fluid, and torque wrench.
Step 1 –Access the Intake Manifold
Start by removing the 8 millimeter bolt that holds on the engine cover. Pull it free.
Use the flathead screwdriver to remove the clamps on the air intake hose.
Lift the air intake assembly up and out.
Pry off the hose from the intake hose.
Remove the three 8 millimeter bolts.
Now remove the three 8 millimeter bolts.
Next, disconnect these two harnesses.
Pry the hose free.
Remove the three 10 millimeter nuts.
Lift up the bracket and pull it aside.
Remove the 8mm bolt.
Pull the bracket aside.
Disconnect the hose clamp and do the same with the other one.
Remove the 10mm nut.
Pull the set of harness aside.
Pull up on the clip on the harness for the fuel injector and then push the tab on the harness and disconnect it.
Repeat the process for the other seven harnesses.
Loosen up the fuel line cap.
Using a flathead screwdriver and a rag covering it, push the tab on the fuel bleeder. This will release the pressure.
Replace the fuel line cap.
Pry off the clip, and then use the 3/8th fuel line separator tool to push it all the way in.Once it’s pushed all the way in you can pull the fuel line free.
Put it on the fuel line under it and repeat this process.
Take a pair of pliers and push the teeth together on the hose clamp. Slide it down the hose.
Pull the hose free.
Remove this series of 10 millimeter bolts along each side the intake manifold.
Lift the intake manifold up and out.
Take the EGR and feed it through the harness and out.
Once it’s fed through, you can lift the intake manifold completely up and out.
Step 2 – Remove the Fuel Lines
Pry up on the knock sensor harness cap.
Using a pair of needle nose pliers, push in on the sides of the harness and then pull up.
Do the same to the other side.
The knock sensors are located underneath the harness.
Using a 22 millimeter socket, remove the knock sensor you’d like to replace.
Step 3 – Replace the Knock Sensors
Feed the new knock sensor into place and just tighten it up.
Push the harness back down onto the knock sensor and replace the cap.
Replace the other end of the harness, and that cap as well.
Set the intake manifold back down into place.
Feed the hose down and through and pull out to the other side.
Disconnect the exhaust gas recirculation by pulling it out with the flathead screwdriver and pulling the hose free.
Feed that hose through the side of the intake manifold.
Maneuver it down and into place by moving the cables and wires around.
Step 4 – Reinstall Components
Reconnect the hose.
Using pliers slide the hose clamp back up into place.
Reconnect the bracket by lining it up with the studs and pushing back.
Replace the nuts.
Take the exhaust gas recirculation valve and push it back down into place.
Replace the bolt that holds the EGR valve there.
Reconnect the hose.
Reconnect the other hose to the top of the intake manifold.
Replace the bracket and the bolts that hold it in place.
Replace each of the long, 10 millimeter bolts that line the side of the intake manifold.
You may need a variety of extensions to more easily get these bolts secure. A flashlight may help also.
Reconnect the fuel lines.
Put the clips back into place to lock.
Torque the manifold bolts. Start in the middle and go across. Then work your way around the manifold in a counterclockwise pattern. Tighten them first to 44 inches pounds and then 89 inches pounds.
Reconnect each of your fuel injectors by pushing the harness in and replacing the clip by pushing it into place.
Do this for all the fuel injectors.
Lower the intake hose back down into place.
Tighten the clamps with the flathead screwdriver.
Double check that all your harnesses and hoses are connected.
Then, replace your engine cover and tighten down the bolt.
With your new engine knock sensor installed, you can cruise at highway speeds enjoying only the sound of your Silverado and the open road around you with no worries of engine malfunction.