factory wholesale good quality Metal Drain Cleaner packing by cross Factory from France
Short Description:
Product Detail
Product Tags
Always customer-oriented, and it's our ultimate target to be not only the most reliable, trustable and honest supplier, but also the partner for our customers for factory wholesale good quality Metal Drain Cleaner packing by cross Factory from France, items won certifications with the regional and international primary authorities. For far more detailed information, please contact us!
Basic Information
■Model Number: RL-STQ002A
Additional Information
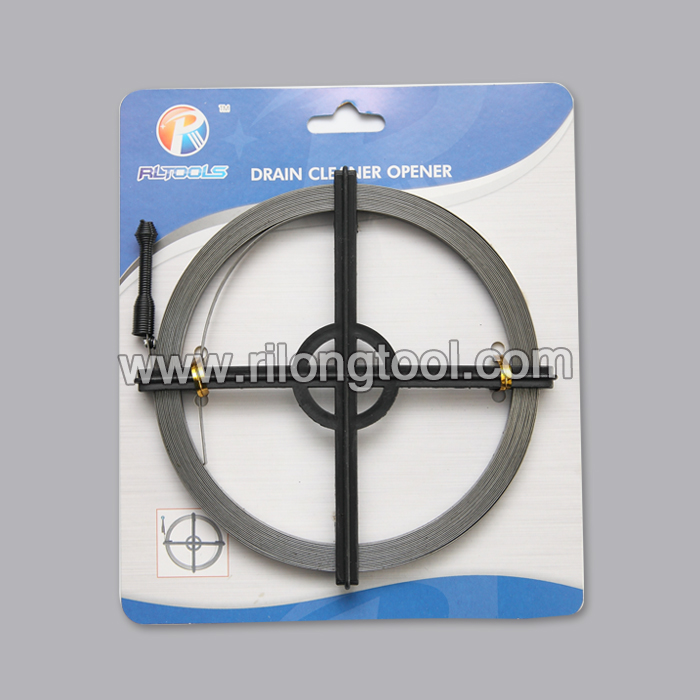
■Material: Carbon Steel
■Size: 3-7.5M
■Width: 5-10mm
■Package: Packing by Cross
■OEM: Acceptable
■Samples: For FREE
■Delivery Time: Always 30 working days depending on the order quantity
■Packing: By standard cartons
Product Description
■This drain cleaner can be used in various types and sizes of pipelines of household toilet, squatting pan, water channel and so on.
Product Image
To download the Project Guide to this video for 99 cents =
https://www.homeownerseries.com/xcart/Toilet-and-Sink-Water-Supply-Valve-Replacement.html
https://www.homeownerseries.com
Part 1 of 2 = https://www.youtube.com/watch?v=X7CWDoZLChU
Part 2 of 2 = https://www.youtube.com/watch?v=2kZ4xWx_vxU
Part Overview = https://www.youtube.com/watch?v=1pLidlD3QBU
To view the Water Supply Valve Playlist = https://www.youtube.com/view_play_list?p=A5F38BD8A94D3933
Water Supply Valve Replacement
Then with Rib Joint Pliers or an adjustable open-end wrench unscrew the water supply hose from the bottom of the toilet’s fill valve shank. Now place one open-end adjustable wrench on the compression nut while placing the second wrench on the water supply valve itself. Once in position hold the water supply valve in place with one wrench while turning to loosen the compression nut with the second wrench. Once the compression nut is loose turn it by hand and remove the valve from the water pipe. When the old valve is removed the compression nut and ring will remain attached to the water supply line. These parts should be reused on the new water supply valve if they are in good condition. However, if corroded or otherwise damaged they will have to be cut off and replaced.
Expect water to drain out of the pipe when the valve is removed so prepare to quickly switch valves. The water can be collected in a small bin that has been placed beneath the valve before removal. The new valve, which was made ready, needs to be fully inserted into the water pipe and aligned vertically. Screw the compression nut onto the water supply valve hand tight. Then take the two open-ended adjustable wrenches and tighten the compression nut onto the water supply valve until it is tight. Be careful not damage the valve, however, it must be tight or it will leak. The water supply valve outlet should be vertical when it is installed correctly. Keep in mind not to force the water supply into a vertical position when the lock nut is tight because this may cause a leak to the water pipe joint behind the wall.
With the water supply valve firmly in place, attach the toilet tank hose to the water supply valve and tighten it carefully. Then attach the water supply hose to the fill valve’s shank and tighten a quarter turn past hand tight.
With the water supply valve in the off position turn on the water main to the house. Return to the toilet and check for water leaks at the water valve connection, if there are none, turn on the water supply valve. With the water supply valve on the toilet’s tank will begin to fill. Inspect the overall assembly for leaks and tighten accordingly. Once the tank has filled replace the lid and the task is complete.
Is your shower arm worn out or broken, the finish doesn’t match your other fixtures, or you just want a new style? Watch as our go-to guy, Mike, shows you how to remove your old shower arm and install a brand new one. He’ll cover tips for getting your shower arm out of the wall without breaking anything and what to do if the arm does get broken, as well as the easiest way to ensure your new shower arm is properly installed and won’t leak.