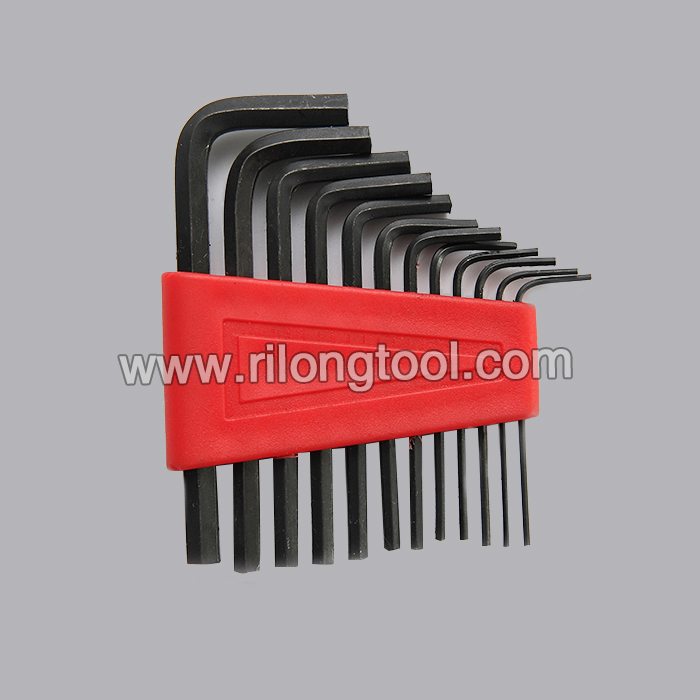
factory customized 12-PCS Hex Key Sets packaged by plastic frame Supply to Madrid
Short Description:
Product Detail
Product Tags
owing to good service, a variety of high quality products, competitive prices and efficient delivery, we enjoy a good reputation among our customers. We are an energetic company with wide market for factory customized 12-PCS Hex Key Sets packaged by plastic frame Supply to Madrid, welcomes all overseas friends and merchants to establish collaboration with us. We will provide you with honest, high quality and efficient service to meet your requirements.
Basic Information
■Model Number: RL-NLJ010
Additional Information
■Material: 45# Carbon Steel
■Size: 1/16″-3/8″, 1.5mm-10mm
■Surface Treatment: Zinc-plated, Black Oxide
■Heat Treatment: Optional
■Package: Plastic Frame
■OEM: Acceptable
■HS Code: 8204110000
■Samples: For FREE
■Delivery Time: Always 30 working days depending on the order quantity
■Packing: By standard cartons
Product Description
■Ningbo Rilong Hardware Tools Factory can provide various kinds of Hex Key with different sizes and packages.
Product Image
Tele-Titan Modular Crimp Tool by Platinum Tools 12507 https://cablesupply.com/tele-titan/ can crimp RJ45, RJ11, and RJ14 mod plugs. The Tele-Titan Modular Crimp Tool features a compact, ergonomic shape, cushioned grip, and lock that makes it easier to use and store than traditional cable crimping tools. It also has a built-in cable cutter and cable stripper that can handle flat and round cables as well as a protective shield that guards your fingers against the blades.
This video demonstrates using the Tele-Titan Modular Crimp Tool to cut and strip silver satin phone cord and terminate it with RJ11 / RJ14 mod plugs. It works just as well on ethernet cable.
This video from Sears PartsDirect shows how to replace the drain pump on a dishwasher. The drain pump pumps water out of the dishwasher. A faulty motor could keep the pump from running at all or if the moving parts are damaged, the drain pump might not function even if the pump runs and the drain path is clear. If your drain pump isn’t draining water, replace it using the steps in this video.
Visit us at:
https://www.searspartsdirect.com?sid=soc:youtube:replacing-the-drain-pump-on-a-dishwasher
Or call 1-800-437-1673 to speak with a parts specialist.
The video includes these parts and tools. Look up your model to make sure you get the right parts for your dishwasher.
Drain pump
https://www.searspartsdirect.com/part-number/WPW10348269/0022/665.html?sid=soc:youtube:direct-part-link
Find parts for dishwasher at
https://www.searspartsdirect.com/dishwasher-parts/c-0130000.html?sid=soc:youtube:dishwasher-parts
Or click here to schedule an appointment with a repair technician.
https://www.searshomeservices.com/repair#showall
Transcript:
The drain pump pumps water out of the dishwasher. A faulty motor could keep the pump from running at all or if the moving parts are damaged, the drain pump might not function even if the pump runs and the drain path is clear. If your drain pump isn’t draining water, replace it using the steps in this video. Wear work gloves to protect your hands. Now, let’s get started. Unplug the dishwasher or shut off the house circuit breaker for the dishwasher. To verify that power is disconnected, make sure the control panel doesn’t light up when you press the buttons. Remove the Torx screws from the inner door panel, support the outer door panel with one hand as you remove the final screws so the outer door panel doesn’t fall. Separate the outer door panel and control panel slightly from the inner door panel. Disconnect the user interface control wire harness from the control panel. Pull off the outer door panel and control panel. Using a nut driver, remove the screws that hold the bottom front access panel and toe panel in place. Pull the access panel and the toe panel forward and remove them. Lay a towel under the drain pump to catch water. Reach under the dishwasher and squeeze the wire hose clamp that holds the drain hose on the pump—use channel-lock pliers if necessary. Pull the drain hose off the drain pump. Remove the wire harness from the drain pump. Press down on the locking tab and then rotate the pump 1/4 turn counterclockwise to pull it out of the sump. Remove the towel. Lubricate the O-ring seal on the new drain pump with a light coat of rinse aid to prevent leaks. Insert the new drain pump in the sump opening and then rotate it 1/4 turn clockwise so the locking tab snaps into place. Plug the wire harness into the receptacle on the drain pump. Reinstall the drain hose on the pump outlet. Use the wire clamp to secure the hose. Position the toe panel on the dishwasher and then position the access panel in front of the toe panel. Insert the mounting screws and tighten the screws firmly. Reconnect the user interface control wire harness and attach the outer door panel and control panel to the inner door panel. Reinstall the mounting screws. Reset the house circuit breaker or plug in the dishwasher to restore electrical power.