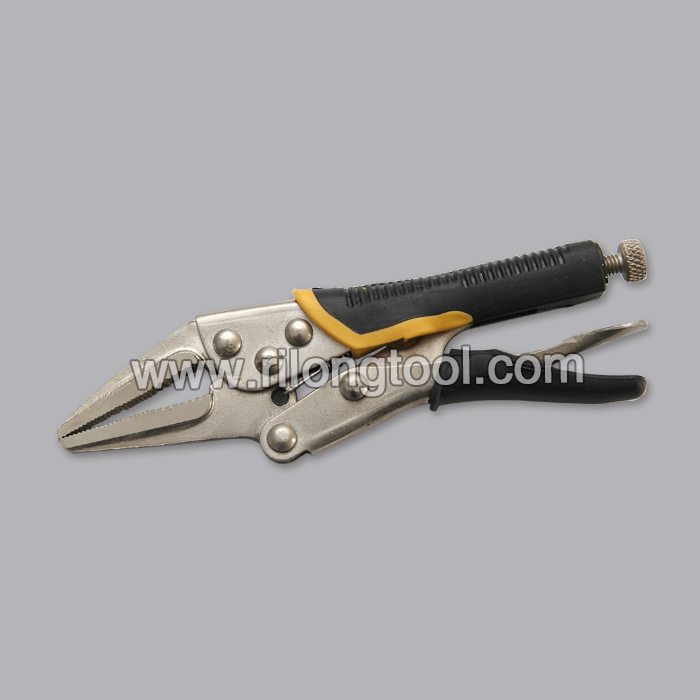
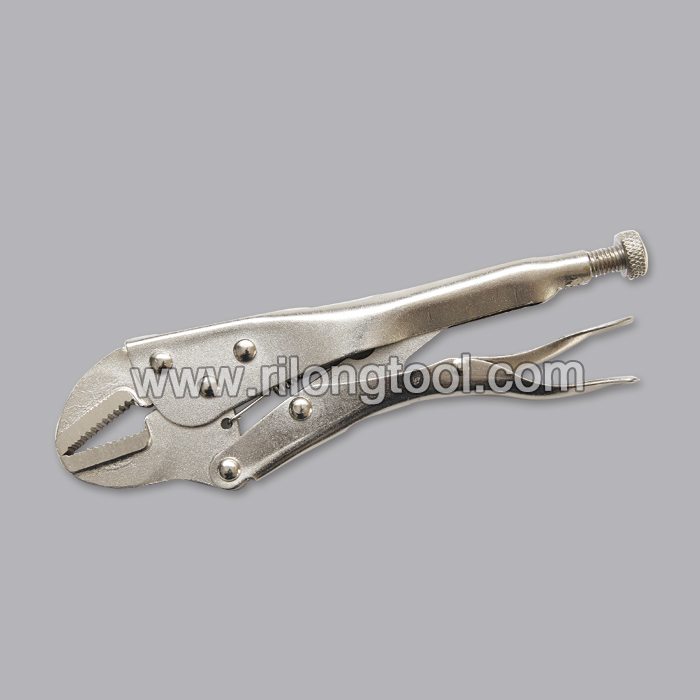
Factory Cheap Hot 10″ Backhand Flat-nose Locking Pliers to Rio de Janeiro Factories

Short Description:
Product Detail
Product Tags
We insist on the principle of development of 'High quality, Efficiency, Sincerity and Down-to-earth working approach' to provide you with excellent service of processing for Factory Cheap Hot 10″ Backhand Flat-nose Locking Pliers to Rio de Janeiro Factories, Our aim is to help customers realize their goals. We are making great efforts to achieve this win-win situation and sincerely welcome you to join us
Basic Information
■Model Number: RL-DLQ010
Additional Information
■Material: A3# steel (Q235) or 45# steel
■Size: 10”
■Surface Treatment: Nickel-plated, Zinc-plated, Black Oxide, Electrophoresis
■Heat Treatment: Optional
■Package: Blister Card, Suction Card, Tie Card, Double Blister Card
■OEM: Acceptable
■HS Code: 8203200000
■Samples: For FREE
■Delivery Time: Always 30 working days depending on the order quantity
■Packing: By standard cartons
Product Description
■Mainly used for clamping parts to rivet, weld, grind and so on, which is characterized by the powerful clamp force produced by the jaw. It can lock tight so that the parts won’t fetch away. Besides, jaws have a lot of levels to adjust for the use of different thickness of parts, and it also can be used as a wrench.
■Flexible using, long life and good tenacity.
■The screw tuning button can give the best clamp size easily.
Product Image
to purchase Eyelet Plier and Eyelet log on to www.chomelcraft.com
Installation of 3″ AFE RB Hi-Tuck Exhaust (Part # AFE49-46232)
2014 Jeep Wrangler JKUS
Tools:
#15 and #16 sockets
Various Screwdrivers
WD40
Shop Towels (for soaking up the grease)
Mallet
Vice-Grip
Install Steps:
1 – Disconnect Battery
2 – Loosen 2 clamps with #15 and #16 sockets
3 – Remove metal posts from rubber hangers (I started with hanger in Driver’s Side Rear, then did hanger closest to Y-Pipe, then hanger further down, then finished with hanger at Passenger Rear, near the exhaust tip).
4 – Remove rearward part of exhaust by tugging/twisting (careful it doesn’t drop on you)
5 – Remove exhaust part connecting to Y-Pipe (may require a mallet to unloosen the bond where the pipes join, get creative, it comes out with some muscle)
6 – Install new AFE exhaust (part that connects to Y-Pipe) by first attaching clamp and then seating into Y-Pipe, attach metal posts into rubber hangers
7 – Do the same for rearward part of exhaust (clamp around exhaust first, then seat), attach metal post into rubber hanger
8 – Tighten the clamps up well
9 – Reconnect battery
10 – Fire it up!
Installation was very easy, it was the removal of the stock exhaust that took the longest amount of time; partly because this was my first time doing this, partly because my neck was cramping bad from not having a creeper or something to support myself while under the Jeep. Total Install Time: 3.5 Hours
Removal of the metal posts in the rubber hangers are, as everyone will tell you, a real pain. Do definitely grease (WD40) up well, and you may need to get creative – I used a combination of screwdriver(s), vice-grip, and muscle to pry all 4 of the metal posts out of the rubber hangers.
I’m writing this at 2AM after a long day of hiking and working on the jeep. It’s not very thorough, but here’s to hoping it helps you.
Feel free to message me if you have questions.