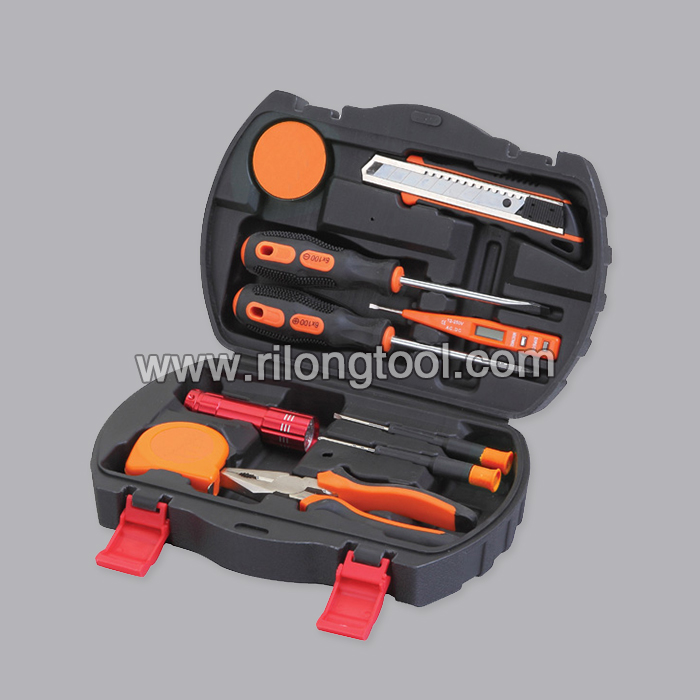
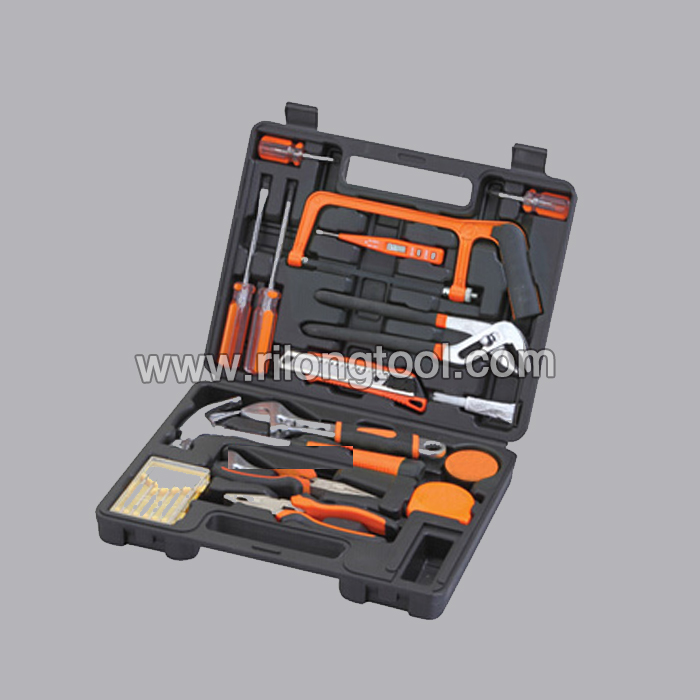
Excellent quality for 21pcs Hand Tool Set RL-TS018 for Curacao Manufacturers
Short Description:
Product Detail
Product Tags
We strive for excellence, service the customers", hopes to become the best cooperation team and dominator enterprise for personnel, suppliers and customers, realizes value share and continuous promotion for Excellent quality for 21pcs Hand Tool Set RL-TS018 for Curacao Manufacturers, We sincerely welcome friends from all over the world to cooperate with us on the basis of long-term mutual benefits.
Basic Information
■Model Number: RL-TS018
Additional Information
■Content:
| 6*100 screwdriver | 2pcs |
| Electroprobe | 1pcs |
| Proof fabric | 1pcs |
| Tape measure | 1pcs |
| Knife | 1pcs |
| Saw bow | 1pcs |
| 6*38 screwdriver | 2pcs |
| Hammer | 1pcs |
| Adjustable spanner | 1pcs |
| Water pump plier | 1pcs |
| Precision screwdriver | 6pcs |
| Proof fabric | 1pcs |
| Cutting plier | 1pcs |
| Long nose plier | 1pcs |
■Package: BMC
■OEM: Acceptable
■Samples: 3 times of the original cost, and you need to afford the express cost
■Delivery Time: Always 30 working days depending on the order quantity
■Packing: By standard cartons
Product Description
■The hand tool set is hand-held, and it is very convenient.
Product Image
This is the first half of How To rebuild a T3/T4 TURBO step by step under $40
Feeling inspired? You can buy kit here: https://astore.amazon.com/nthefastlaneshoppingcart2-20?_encoding=UTF8&node=38
Part 2 link.. https://www.youtube.com/watch?v=Y2t9g6huUL4
Help Support My Channel: https://www.paypal.com/cgi-bin/webscr?cmd=_s-xclick&hosted_button_id=9ZT925NTLR5E6
Visit me at: https://www.Nthefastlane.com
Facebook: https://www.facebook.com/Nthefastlane
Google+: https://plus.google.com/117540915227325837174
-~-~~-~~~-~~-~-
If an “NTHEFASTLANE” Video has helped you in anyway, please, consider giving by using “Patreon” to help support my channel. The videos take a lot of time and effort to create. Creating video takes a lot of quality time that could be spent doing a repair that pays a lot more. Over all it make things a lot more difficult to pay the bills!. CLICK HERE: https://www.patreon.com/Nthefastlane
THANK YOU!!!
Jeremy.
-~-~~-~~~-~~-~-
Due to factors beyond the control of NTHEFASTLANE, it cannot guarantee against unauthorized modifications of this information, or improper use of this information. Nthefastlane assumes no liability for property damage or injury incurred as a result of any of the information contained in this video. NTHEFASTLANE recommends safe practices when working with power tools, automotive lifts, lifting tools, jack stands, electrical equipment, blunt instruments, chemicals, lubricants, or any other tools or equipment seen or implied in this video. Due to factors beyond the control of NTHEFASTLANE , no information contained in this video shall create any express or implied warranty or guarantee of any particular result. Any injury, damage or loss that may result from improper use of these tools, equipment, or the information contained in this video is the sole responsibility of the user and not NTHEFASTLANE .
Video tutorial on how to cut a single ear or double ear crimp style hose clamp. I do show a couple different methods in this tutorial, each method will be dependant if you have the tools on hand. If you plan on using the high speed rotary tool method, DO NOT USE it on flammable fluids, this does create some heat, as well as sparks which could cause a fire. These crimp clamps are only intended to be for one time usage, once cut they cannot be removed again. They can be found on a variety of applications such as vacuum lines, coolant lines, fuel lines, hydraulic lines, washer fluid lines, etc.
Website: https://4diyers.com
Facebook: https://www.facebook.com/4diyers
Google Plus: https://plus.google.com/+4DIYers
Twitter: https://twitter.com/4DIYers
Instagram: https://www.instagram.com/4diyers/
Tumblr: https://4diyers.tumblr.com
Pintrest: https://www.pinterest.com/4diyers/
Tools/Supplies Needed:
-bullnose pliers/end-cutting pliers
-side cutters/diagonal cutting pliers
-high speed rotary tool/Dremel
-arbor with abrasive cutting disk
-safety glasses
-gloves
Procedure:
-in order to remove this style of clamp, it does have to be cut to release the tension and be remove
-the ear can be mechanically cut by using the specific tool intended for these clamps or using a pair of bullnose pliers/end-cutting pliers or side cutters/diagonal cutting pliers can be used to cut the ear
-if you are limited for room, do not have leverage required to cut it, or are having trouble cutting it in general you can use a high speed rotary tool with an abrasive cutting disk
-I do not recommend using the high speed rotary tool with an abrasive cutting disk on flammable fluids
-be sure to wear safety glasses when using this method, gloves are also great protection as well
-once the ear is cut using either method, even a double ear crimp clamp only requires one ear to be cut, the clamp can be spread open
-you can either bend the clamp open and remove the clamp, or slide the clamp back
-now you can remove the hose off the fitting
Thank you to all those who watch my videos and support my content. Don’t forget to subscribe to my channel for future tutorial videos and like my video if you found it helpful. New videos are always being uploaded every week!
© 4DIYers 2013
All Rights Reserved
No part of this video or any of its contents may be reproduced, copied, modified or adapted, without the prior written consent of the author.