Best Price for 10″ Backhand Flat-nose Locking Pliers with Jackets Bulgaria Manufacturer

Best Price for
 10″ Backhand Flat-nose Locking Pliers with Jackets Bulgaria Manufacturer

Short Description:


Product Detail

Product Tags

We pursue the management tenet of "Quality is superior, Service is supreme, Reputation is first", and will sincerely create and share success with all clients for Best Price for 10″ Backhand Flat-nose Locking Pliers with Jackets Bulgaria Manufacturer, we have built a reliable reputation among many customers. Quality&customer first are always our constant pursuit. We spare no efforts to make better products. Look forward to long-term cooperation and mutual benefits!


Basic  Information


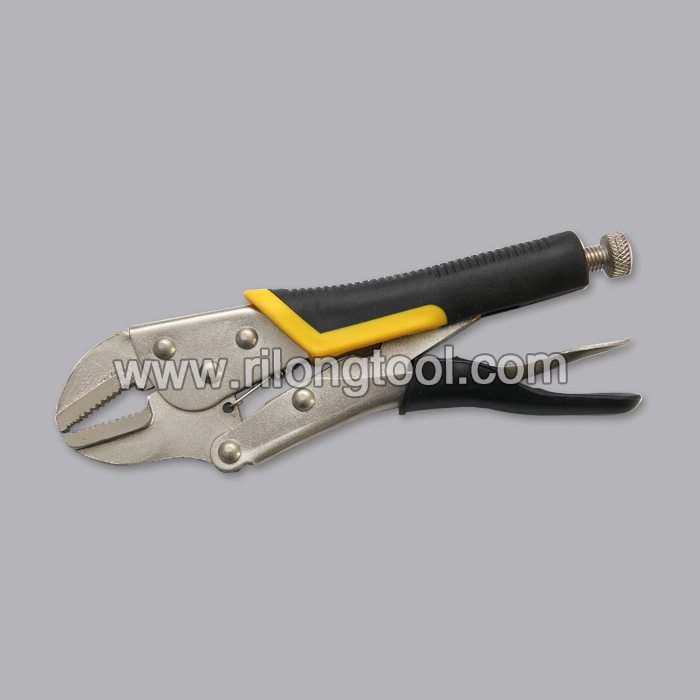
■Model Number: RL-DLQ015

Additional Information


■Material: A3# steel (Q235) or 45# steel

■Size: 10”

■Surface Treatment: Nickel-plated, Zinc-plated, Black Oxide, Electrophoresis

■Heat Treatment: Optional

■Package: Blister Card, Suction Card, Tie Card, Double Blister Card

■OEM: Acceptable

■HS Code: 8203200000

■Samples: For FREE

■Delivery Time: Always 30 working days depending on the order quantity

■Packing: By standard cartons

Product Description


■Mainly used for clamping parts to rivet, weld, grind and so on, which is characterized by the powerful clamp force produced by the jaw. It can lock tight so that the parts won’t fetch away. Besides, jaws have a lot of levels to adjust for the use of different thickness of parts, and it also can be used as a wrench.

■Flexible using, long life and good tenacity.

■The screw tuning button can give the best clamp size easily.

Product Image

  • Previous:
  • Next:


  • Joe Schwab demonstrates how to properly “sight-in” Crimson Trace laser sights.

    - Adjusting Laser Using Allen Head Screws

    Windage and elevation can be adjusted by turning the screws on the top and side of the laser diode. Each screw makes contact with a small post attached at the back of the laser diode. Turning the screw presses on this post and changes the direction of the laser beam. Allen head wrenches are included with every new Crimson Trace Lasergrip.

    The Allen head screw at the top changes the elevation (the up or down of the laser movement). The screw on the side allows you to adjust the windage (side movement from left to right). Keep in mind, a little adjustment goes a long way. It is recommended that you make adjustments in no more than quarter-turn increments.

    - Step One — Sighting To Iron Sights

    The first step to sighting in your Lasergrips is to establish a proper sight picture. That is to align to top of your front sight with the top of your rear sight while having an equal amount of light on either side of the front sight post. The laser, when properly adjusted, will be located just above the front sight post.

    -Step Two — Sighting Laser To Point Of Impact

    Now that the laser and the iron sights are aligned, further adjustment can be made to ensure the laser aims directly at the point of impact. After test firing the gun with live rounds, it will become evident if the laser needs further adjusting. Using the screws, make small adjustments until the laser dot consistently matches up with the point of impact.

    Purchase Crimson Trace at: https://www.lasersightcity.com


    My room mates and I received a pleather couch with lots of holes and ripped seams. Basically it looked terrible. Using some common sense and just the tools I had handy I was able to close the holes so that they won’t open again and are barely visible unless pointed out.
    For hard to sew crevices a normal (straight) sewing needle won’t work. You will need to take a pair of needle nose pliers and SLOWLY apply force to make it bend while holding the portion you are trying to bend over an open flame. Heating the metal makes it malleable and will allow it to bed without snapping.

    Double up your thread so every time you thread a hole there are TWO strands of thread, not one.

    When sewing, bring the needle the back through the excess loop you have yet to pull all the way through and finish pulling. This will make the loop portion pull the thread down and create a better hold. Youtube a video on how to sew a seam if you’d like. once you know the pattern you want to use:

    Sew the rip from point A to B then tie it off.

    Cut off any loose threads at the ends.

    Apply super glue to the threads and seams allowing the liquid super glue to absorbs into the threads themselves and the fabric underneath.

    Final result will be a seam just as strong if not stronger than before.

    You MUST use the super glue. Otherwise the threads will rip through the pleather fabric very easily, as the thin threads apply a lot of force to a small area, like if you were to use tooth floss to cut a hard boiled egg.

    Hope this video helps some of you DIY people.

    Send your message to us:

    INQUIRY NOW
    • [cf7ic]

    Related Products

    INQUIRY NOW
    • [cf7ic]
    INQUIRY NOW
    • [cf7ic]
    WhatsApp Online Chat !