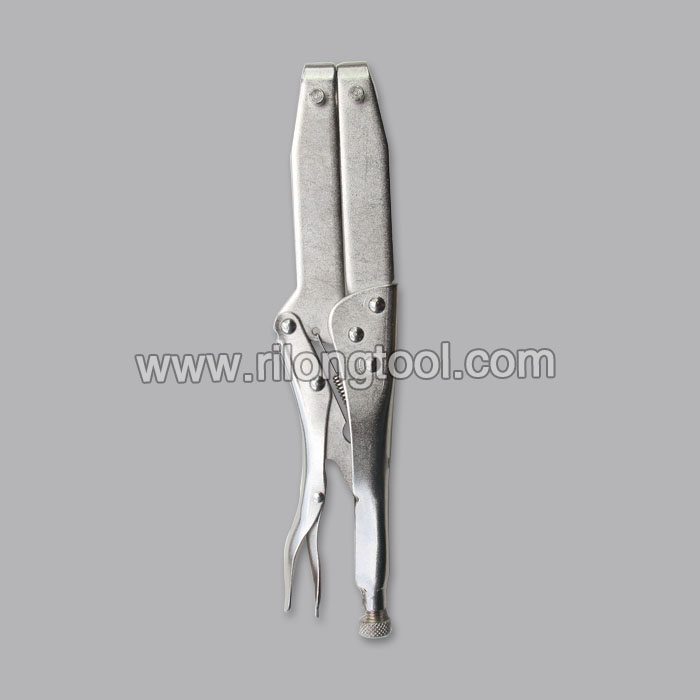
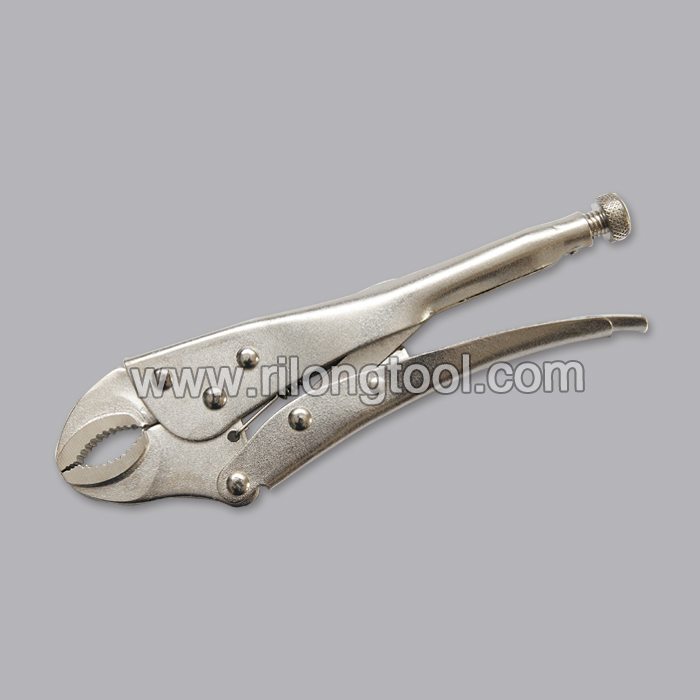
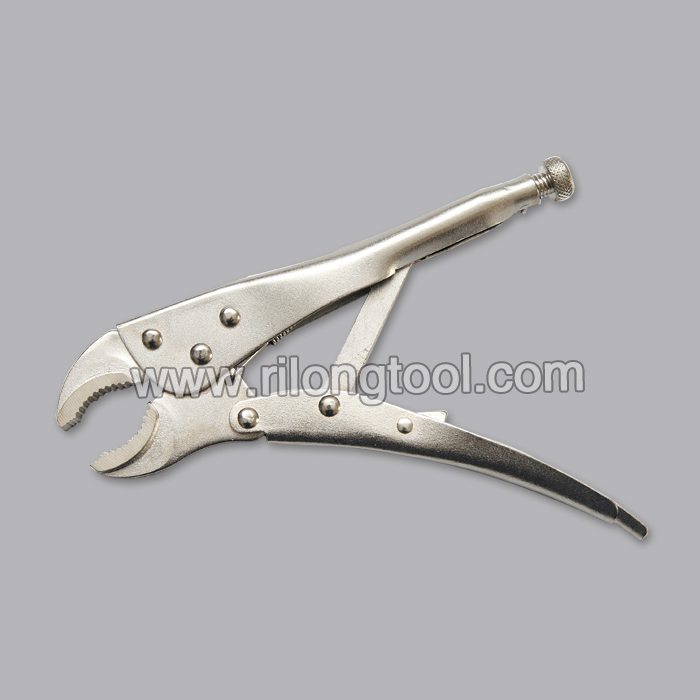
27 Years Factory 10″ Forehand Round-Jaw Locking Pliers for Detroit
Short Description:
Product Detail
Product Tags
we can offer high quality products, competitive price and best customer service. Our destination is "You come here with difficulty and we give you a smile to take away" for 27 Years Factory 10″ Forehand Round-Jaw Locking Pliers for Detroit, We will do our best to meet your requirements and are sincerely looking forward to developing mutual beneficial business relationship with you!
Basic Information
■Model Number: RL-DLQ005
Additional Information
■Material: A3# steel (Q235) or 45# steel
■Size: 10”
■Surface Treatment: Nickel-plated, Zinc-plated, Black Oxide, Electrophoresis
■Heat Treatment: Optional
■Package: Blister Card, Suction Card, Tie Card, Double Blister Card
■OEM: Acceptable
■HS Code: 8203200000
■Samples: For FREE
■Delivery Time: Always 30 working days depending on the order quantity
■Packing: By standard cartons
Product Description
■Mainly used for clamping parts to rivet, weld, grind and so on, which is characterized by the powerful clamp force produced by the jaw. It can lock tight so that the parts won’t fetch away. Besides, jaws have a lot of levels to adjust for the use of different thickness of parts, and it also can be used as a wrench.
■Flexible using, long life and good tenacity.
■The screw tuning button can give the best clamp size easily.
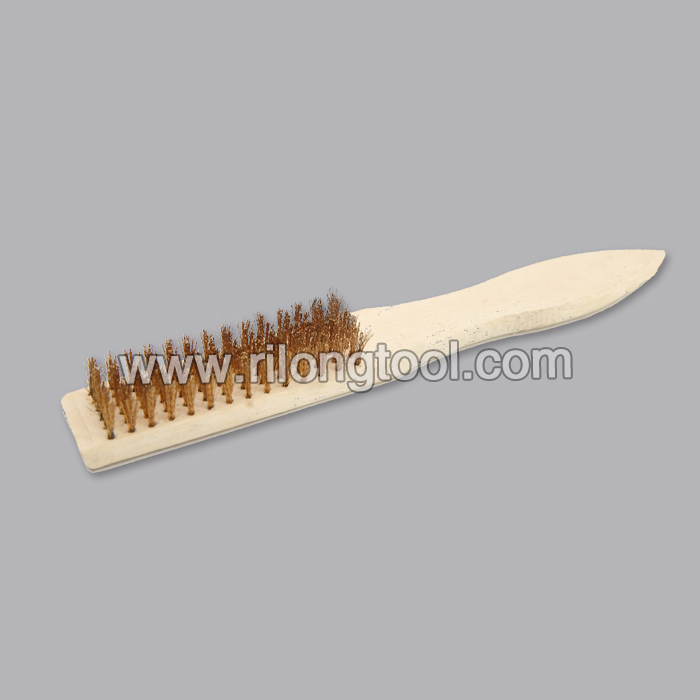
Product Image
In partnership with https://www.FaveCrafts.com , I am pleased to present this video on the basic tools and materials you’ll need to start jewelry making!
For more free craft projects, video tutorials and craft tips, visit https://www.FaveCrafts.com .
In this video I will show you what you’ll need to start jewelry making. There are many different kinds of techniques used for jewelry making, but I will only show you the bare necessities for stringing, the simplest technique. I am also going to discuss what you need to make earrings.
▬▬▬▬▬▬▬▬▬▬▬▬▬▬
» Tools «
• Long-nose pliers
• Round-nose pliers
• Side cutters (a.k.a. wire cutters)
• Crimping pliers
• A couple of beading needles (they come in little packs.)
• A good ruler (so you can see the numbering easily)
• A beading dish (you don’t need to spend the money on fancy beading trays. All you need right now are some plastic lids or a shallow dish.)
» Hint: You can usually find a set of pliers at a great price. You don’t need to spend a whole lot on pliers when you are just beginning.
» Materials «
• Beading wire
There are many different brands of beading wire, but all you need to look for is the number of strands as well as the diameter of the wire. When I started beading, I used a 7-strand beading wire. To be completely honest, I became frustrated with it. I would highly recommend you start out with at least a 21-strand beading wire that is about .019″ in diameter. I recommend purchasing a couple spools and the color should be something neutral like silver.
• Beading thread
A spool of black and a spool of white is all you need. I like to use Nymo thread.
• Crimping beads
1mm and 2mm crimp beads are what I usually use.
• Crimp covers
These are optional. I find that they come in handy to keep the wire end from hitting against the skin. They also make your jewelry look more professionally finished.
• Jump rings
I like to use 5mm jump rings.
• Clasps
Spring ring clasps are a good choice for both necklaces and bracelets. Lobster claw clasps are nice, but I usually don’t like to use them for necklaces.
• Chain tabs
These are used on the opposite side of the clasp. These have two openings, one at either end. The small opening is for you to attach your beaded work. The other opening is for the clasp to hook onto.
• Bead tips
These are used for finishing jewelry strung on beading thread. I like to use the bottom clamp on bead tips.
• Ear wires
If you are interested in making earrings, you must have ear wires! Just find a value pack of ear wires to start out with and soon you’ll find out what kind of ear wires are your favorite.
• Headpins
These are a necessity when making earrings. Just string a few beads onto a headpin, make a loop on the top, attach to your ear wire, and you have a beautiful earring!
▬▬▬▬▬▬▬▬▬▬▬▬▬▬
Thanks so much for watching! This tutorial was brought to you by https://www.FaveCrafts.com .
Socialize with me!!
┌ Website and blog: https://www.eclecticdesignsbycatherine.com
├ Google Plus: https://plus.google.com/+Eclecticdesignsbycatherine
├ Facebook: https://www.facebook.com/EclecticDesignsbyCatherine
├ Twitter: https://twitter.com/EDbyCatherine
├ Pinterest: https://pinterest.com/eclecticdesigns
├ Subscribe to my blog! https://feeds.feedburner.com/eclecticdesignsbycatherine/odjp
├ Want to contact me? Message me here on YouTube or leave a comment on any video! I read each and every comment posted.
└ Business inquiries? Email me at myeclecticdesigns@yahoo.com!
≧◠◡◠≦✌
Disclaimer: All products used in this video were purchased by me. FaveCrafts has compensated me for this video.
We received no compensation for the mention of or display of products or companies in this video.
With both of us sick the past few weeks the shower got a lot of use. Because of this I found we had a leak in the drain from the shower. The floor between the bed and the shower was wet one night. I opened up the access point here and looked inside and besides finding the floor wet I also found cause, the pipe had come loose from the drain.
This was because the attaching collar had broken, and based on the amount of residue on the parts it had been this way for a while. So while this needed to be repaired it could wait a day or 2 until I could get the parts and get feeling a little better. But I had to seal the leak until then, so I used some of the duct sealing tape to form a funnel of sorts to direct the water into the drain pipe. I also added a foil tray under it to catch the drips.
To dry out the floor under the shower, I put a fan to push air through this area. On our Alfa See Ya, there are 2 access points for the shower drain pipes, one on the bedroom side and the other on the toilet room side. This dried most of the floor in a day and kept the drips from overflowing the tray.
Getting the parts needed was next. Because the factory used a glued in down pipe to the P-trap, replacing the collar nut required replacing the entire p-trap. The new p-trap uses a slip in down pipe so I can adjust the length as needed. There is no kit for this setup so I had to get each piece separately although I was able to reuse one of the gaskets and one elbow.
Because of the tight space I couldn’t fit my pipe wrench into the space and still turn the wrench. Even my strap wrench was too long. However my slip joint pliers just fit in and could grab just enough of the union nut to get it to turn. Once it was loose I could turn it by hand to get the old p-trap off. Then I used a rag to sop up the spilled water. All of this was done with one hand because that is all I could get into this access point.
Next I had to put together the new p-trap. I put the collar nut and the gasket together on the down pipe then put it on the new p-trap. I then checked the size to the old one and saw that I would have to cut a little off. This was easy with my PVC pipe cutter. Then peeling off the label because they do not seal very well.
The new p-trap comes with a 90 deg angle that I reused from the old one since this part is glued on.
Then slipping in the shortened down pipe, I could then work at using one hand to put on the new p-trap on the drain, then on the old 90 deg angle. The pipes being able to slip made fitting simpler. After tightening each of the nuts by hand I could then test the drain by running water trough it and feeling around for leaks. Another day of the fan then closing it up.