2 Years\’ Warranty for 9-PCS Double Star-type Hex Key Sets packaged by folded plastic frame for Australia Factories

2 Years\’ Warranty for
 9-PCS Double Star-type Hex Key Sets packaged by folded plastic frame for Australia Factories

Short Description:


Product Detail

Product Tags

We aim to find out quality disfigurement from the production and supply the best service to domestic and overseas customers wholeheartedly for 2 Years\’ Warranty for 9-PCS Double Star-type Hex Key Sets packaged by folded plastic frame for Australia Factories, We look forward to supplying you with our products in the near future, and you will find our quotation is very reasonable and the quality of our products is very excellent!


Basic  Information


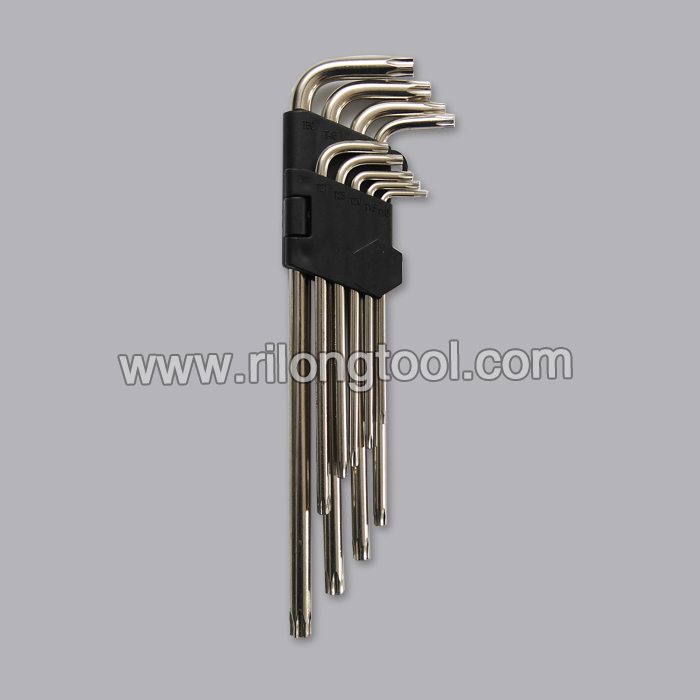
■Model Number: RL-NLJ013

Additional Information


■Material: 45# Carbon Steel

■Size: 1/16″-3/8″, 1.5mm-10mm

■Surface Treatment: Zinc-plated, Black Oxide

■Heat Treatment: Optional

■Package: Plastic Frame

■OEM: Acceptable

■HS Code: 8204110000

■Samples: For FREE

■Delivery Time: Always 30 working days depending on the order quantity

■Packing: By standard cartons

Product Description


■Ningbo Rilong Hardware Tools Factory can provide various kinds of Hex Key with different sizes and packages.

Product Image

  • Previous:
  • Next:


  • 1,5,This video shows the repair of the|compressed air system on the new Actros.||
    6,9,Operations have to be performed |on both air compressors.||
    10,15,Here, the operations are performed on |a freestanding engine for better viewing.||
    16,18,First remove the following parts:|||
    19,28,resonance head, intake manifold, downpipe,|exhaust manifold, compressor line, …||
    29,33,… the two coolant lines (feed and return),|oil line, supply line, …||
    34,36,… detach the AdBlue timer |from the compressor.||
    37,43,If there is a problem with the horizontal|air compressor, assembly is performed in the|same way as on the vertical air compressor.|
    44,47,There are two options for removing|the compressors:||
    48,50,Option 1: Both are removed.|||
    51,53,In this case, make sure that|the parts do not get mixed up.||
    54,58,Option 2: First one compressor is removed |and reinstalled and then the other.||
    59,62,With the last variant, |no parts can get mixed up.||
    63,66,For this reason, the second and |safer variant is shown here.||
    67,73,Start at the cylinder head – in this case|on the vertical compressor.||
    74,80,Unscrew the cap from the TDC hole.|||
    81,90,The turning device can then |be fitted to the timing case.||
    95,100,When turning, make sure that the engine|turns in the correct direction.||
    101,108,If the piston is not at the|top dead center position:||
    109,115,Turn the turning device until|the piston reaches TDC.||
    116,124,Detach the cylinder liner.|||
    127,129,Then detach the seal.|||
    130,138,Wipe off the grease before|installing the new seal.||
    139,146,The cylinder liner and air compressor|piston can now be replaced.||
    147,149,New tools are available for|the installation:||
    150,168,Piston ring compressor pliers and two piston|ring compressor bands in different sizes.||
    171,181,These tools were specially developed |to simplify piston installation.||
    182,187,The piston ring compressor band can |easily be held with the new piston ring |compressor pliers.|
    188,208,In addition, the compressor band |can be easily adjusted to the piston.||
    211,222,Mount the cylinder head.|||
    224,226,Fasten the four bolts |on the cylinder head.||
    227,236,Tighten the bolts to 20 Nm in the first stage,|and to 40 Nm in the second stage.||
    237,240,The horizontal compressor is removed|in the same way as the vertical compressor.||
    241,248,Installation is shown next.|||
    249,252,The horizontal angle makes|installation more difficult.||
    253,264,The cylinder liner also |makes things difficult.||
    278,284,Adjust the new seal precisely|to the cylinder liner.||
    284,292,Otherwise, the bolts which fix the cylinder |head and cylinder liner to the timing case |will not fit through the holes.|
    293,302,First tighten the four bolts on the cylinder |head to 20 Nm and then to 40 Nm |in the second stage.|
    303,307,The remaining parts are installed|in reverse order.||
    308,312,Finally, remove the turning device|from the timing case.||
    313,319,The repair of the compressed air system|is thus complete.||


    Send your message to us:

    INQUIRY NOW
    • [cf7ic]

    Related Products

    INQUIRY NOW
    • [cf7ic]
    INQUIRY NOW
    • [cf7ic]
    WhatsApp Online Chat !
    Close