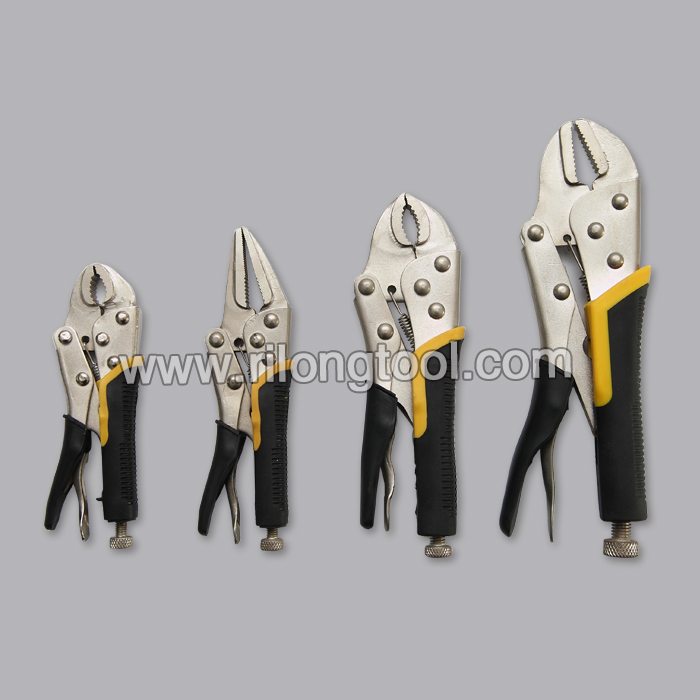
15 Years manufacturer 4-PCS Locking Pliers Sets with Jackets for moldova Importers
Short Description:
Product Detail
Product Tags
Quality comes first; service is foremost; business is cooperation" is our business philosophy which is constantly observed and pursued by our company for 15 Years manufacturer 4-PCS Locking Pliers Sets with Jackets for moldova Importers, We hope to establish more business relationships with customers all over the world.
Basic Information
■Model Number: RL-DLQ025
Additional Information
■Material: A3# steel (Q235) or 45# steel
■Size: 5”, 6.5″, 7″, 10″
■Surface Treatment: Nickel-plated, Zinc-plated, Black Oxide, Electrophoresis
■Heat Treatment: Optional
■Package: Blister Card, Suction Card, Double Blister Card
■OEM: Acceptable
■HS Code: 8203200000
■Samples: For FREE
■Delivery Time: Always 30 working days depending on the order quantity
■Packing: By standard cartons
Product Description
■Mainly used for clamping parts to rivet, weld, grind and so on, which is characterized by the powerful clamp force produced by the jaw. It can lock tight so that the parts won’t fetch away. Besides, jaws have a lot of levels to adjust for the use of different thickness of parts, and it also can be used as a wrench.
■Flexible using, long life and good tenacity.
■The screw tuning button can give the best clamp size easily.
Product Image
Get a replacement battery wiring harness for your Black and Decker CST1200 string trimmer here: https://www.ereplacementparts.com/wiringinternal-p-96021.html
This tutorial will show you how to remove and install the battery wiring harness on a Black and Decker CST1200 string trimmer. Helpful items include a screwdriver and needle-nose pliers.
For other Black and Decker CST1200 string trimmer parts, visit: https://www.ereplacementparts.com/black-and-decker-cst1200-volt-cordless-trimmer-edger-parts-c-4167_9518_9522.html
SHOP FOR PARTS: https://bit.ly/13lKsY8
VIEW MORE REPAIR GUIDES: https://bit.ly/14toDXg
ASK THE DIY COMMUNITY: https://bit.ly/14zoiD9
SUBSCRIBE AND NEVER MISS ANOTHER VIDEO!
https://www.youtube.com/subscription_center?add_user=ereplacementparts
CONNECT WITH US!
Google+ ► https://bit.ly/11jLCFi
Facebook ► https://www.facebook.com/replacementparts
Twitter ► https://twitter.com/toolparts
Linkedin ► https://us.linkedin.com/company/ereplacementparts.com
eReplacementParts ► https://www.ereplacementparts.com/
Don’t forget to LIKE, SHARE, and LEAVE A COMMENT!
THANKS FOR WATCHING!
https://www.AsWoodTurns.com
There’s still time to enter this year’s Christmas Ornament Woodturning Challenge. See https://youtu.be/KnPEz-X-T34 for details and this year’s challenge playlist for all ornament video submissions at https://www.youtube.com/playlist?list=PL4W9FE566kZgvJVxPKGpzOJOkOQ_goWjd
We appreciate all skill levels and all types of Christmas ornaments.
As promised, this is my build video for my DIY or home made pen for pyrography or woodburning on my woodturning projects.
This pyrography pen uses;
- 6″ ¾” PVC pipe
- 6-8 feet 14 gauge insulated stranded wire – Ace Hardware
- ¼” Male Power Jack
- 4 PA10HDS-R connectors from connector strip – #215029 TERMINAL BLOCK,12-POS,10MM, $2.3900 – Jameco Electronics
- 8” – 1/8” brass rod
– JB Weld Epoxy
- 1 cotton ball
- 1–strip thick veneer, popsicle stick, or solid wood a little longer than the brass rod plus connector length
- electrical tape.
The most difficult item to source are the connectors. I could not find them in local stores such as Radio Shack or Fry’s. I ordered them online from Jameco electronics. Others from my club found them at a commercial electronics supply firm.
The connectors are sold in a block of connectors. I tried to unscrew the screws to extract the metal tube but could not remove the screw from the plastic housing. Then I succeeded when I tightened the screw then clipped the plastic and pried back the plastic. Then I could easily remove the screw and slide out the metal connector.
I soldered the wire to my 1/4″ power jack which matches the jack I installed in the vaporizer.
I cut two pieces of 1/8″ brass rod about 4 inches long and tightened a connector to each end. Then I glued the flats on the metal connectors on one brass rod to a piece of veneer. After the glue dried, turned it over and glued the other rod with connectors to the other side. Then I wrapped both ends with electrical tape.
With my sub assembly complete, I connected the wire and inserted the rod assembly into the PVC pipe. After stuffing cotton into each end, I filled each end with JB Weld epoxy.
This completed the pen.
Home made tips are made from nichrome wire 18 to 22 gauge. Molly Winton recommends 20 or 22 gauge.
My pen can use both Razortip commercial tips and home made tips.
This is a great project, very economical, to create a variety of effects applied to woodturning projects. My “Vaporizer” packs enough power punch to drive even larger pens.
Good turning.
Enter your email at https://www.AsWoodTurns.com & I’ll let you know when the next easy woodturning project video is ready.
Blog: https://www.AsWoodTurns.com
FB: https://www.Facebook.com/AsWoodTurns
Music: Bach Guitar Calm under license via Adobe Premiere Elements Smart Sound.